Agent Permissions
Agent permissions control what an agent can access and do within the workspace. By defining explicit permission rules on each agent, administrators can limit the scope of agent activity to only the resources and tools that are needed.
Overview
Section titled “Overview”There are two types of permission rules:
Resource permissions govern access to data entities such as tickets, comments, labels, and profiles. Each resource permission specifies one or more actions — Read, Create, Update, or Delete — and can be restricted to a particular scope. The wildcard (*) grants access to all resources with all actions.
Tool permissions govern which tools an agent may invoke during execution, including Bash commands, file operations (Read, Write, Edit), and Kombuse MCP tools. A wildcard tool permission grants access to all tools.
Permissions are configured per agent in the agent’s Configuration tab.
Configuring Permissions
Section titled “Configuring Permissions”The Permissions section is located in the agent’s Configuration tab, displayed as a collapsible panel with a Shield icon. When permission rules have been defined, the count appears in parentheses next to the heading (e.g. “Permissions (3 rules)”).
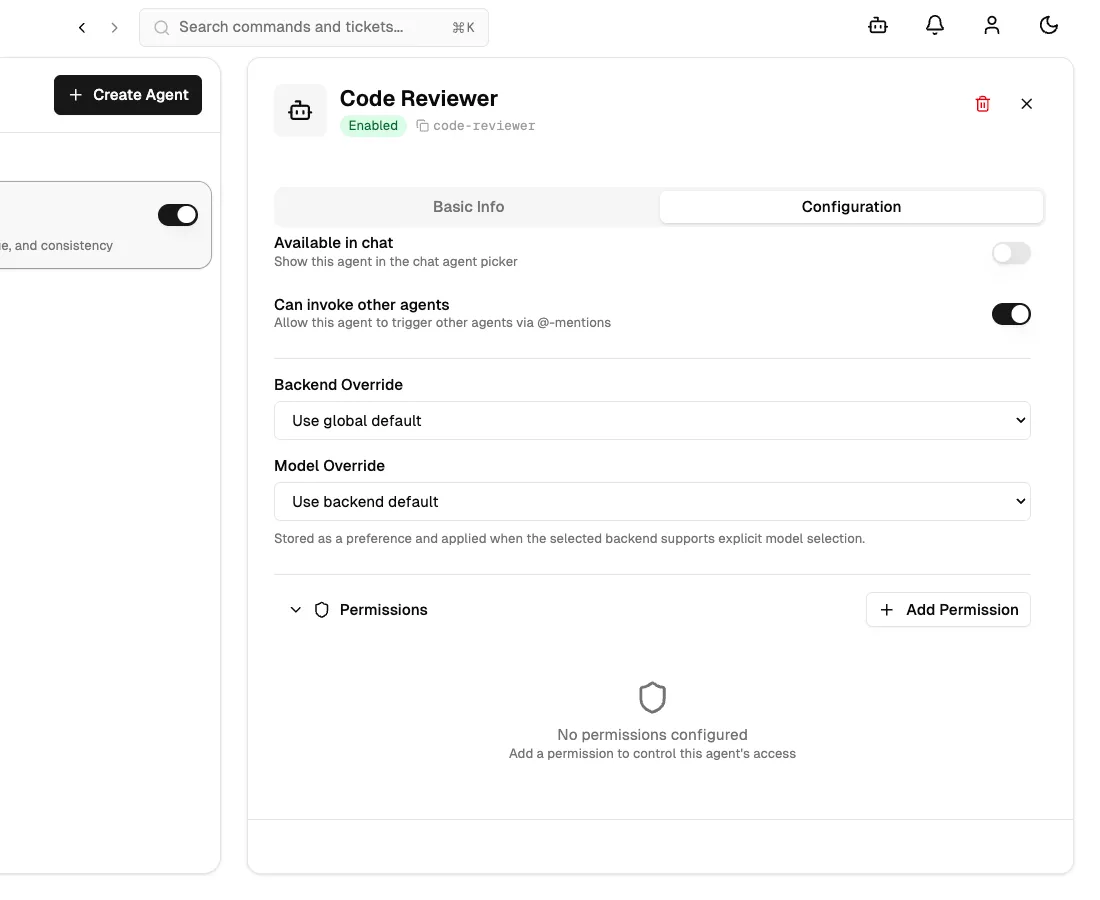
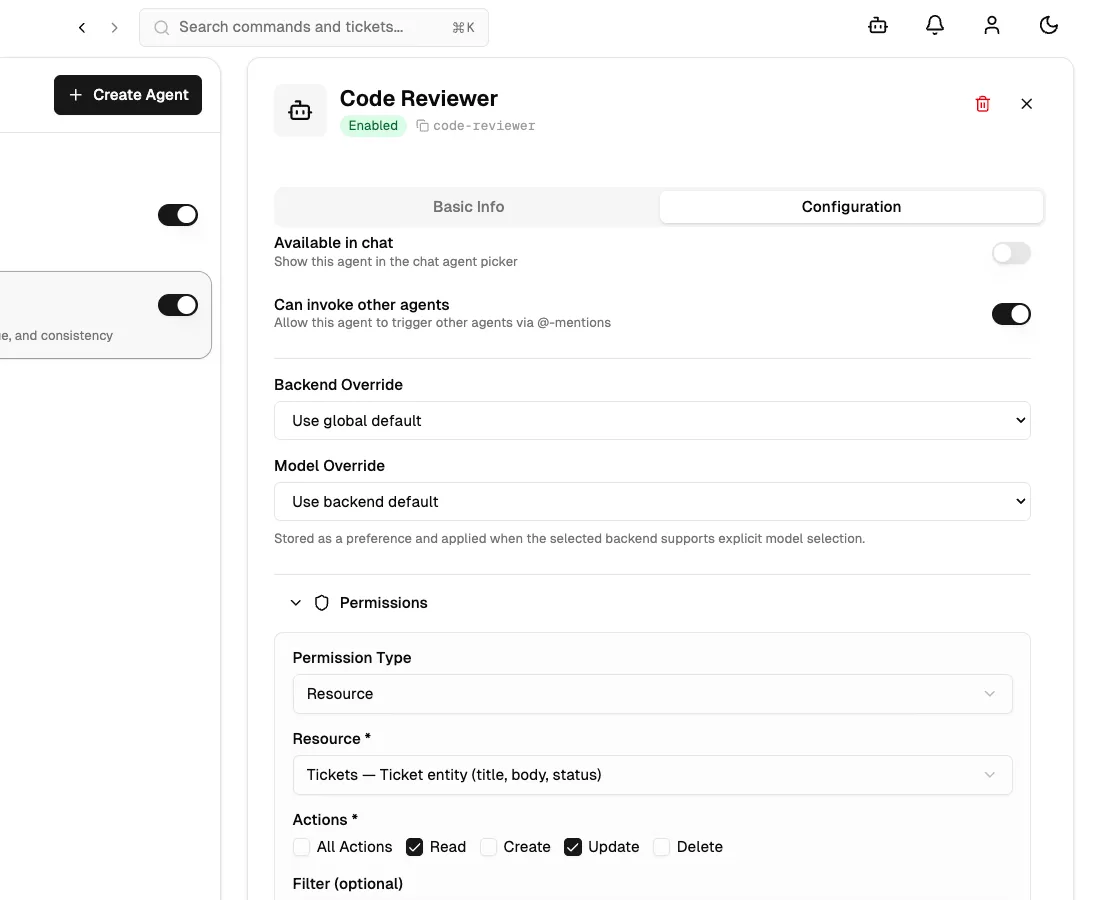
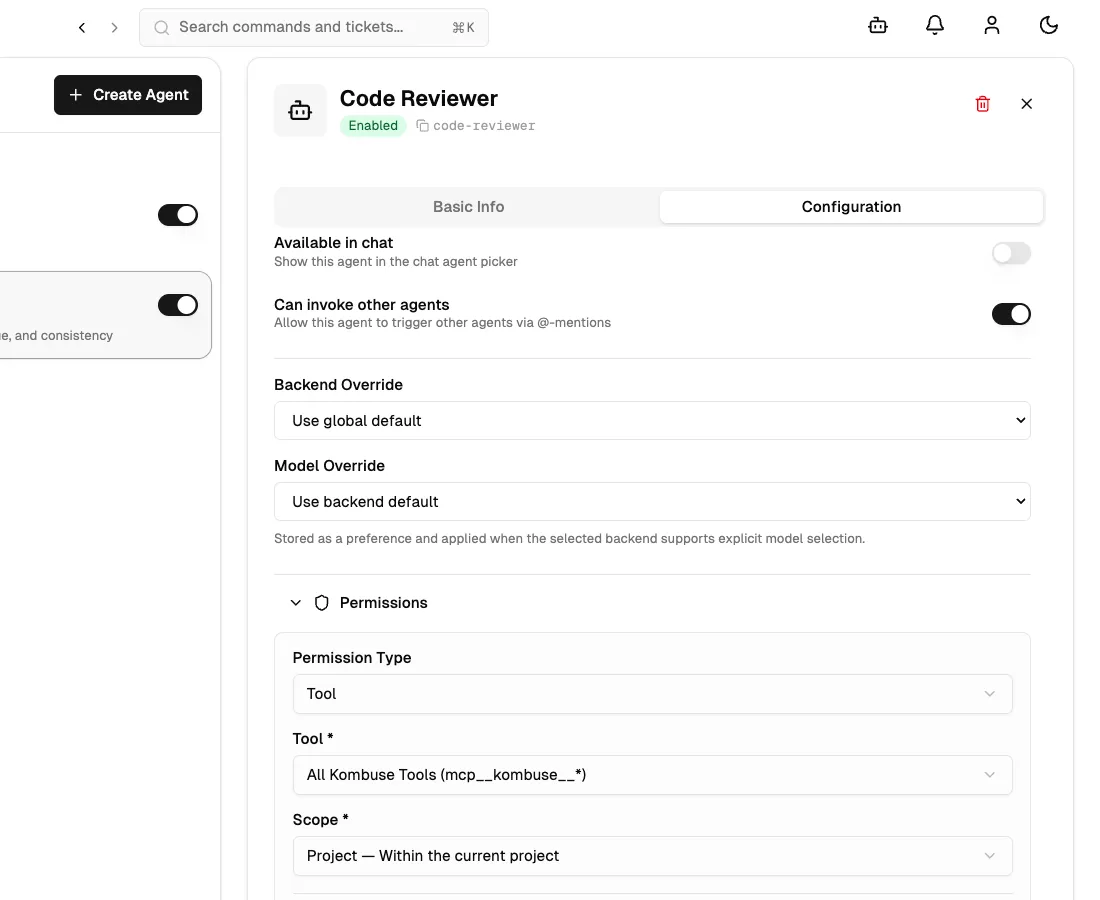
Clicking Add Permission opens an inline form. The Permission Type dropdown switches the form between Resource and Tool modes.
For Resource permissions, the form presents:
- Resource — a dropdown with preset options (All Resources, Tickets, Comments, Labels, Profiles) and a “Custom pattern…” entry for arbitrary patterns
- Actions — checkboxes for Read, Create, Update, and Delete; selecting “All Actions” disables the individual checkboxes
- Filter — an optional text field reserved for future use
- Scope — a dropdown selecting the breadth of the rule (see Permission Scopes below)
Switching the Permission Type to Tool replaces the resource and action fields with a single Tool dropdown. Options include individual MCP tools (such as Get Ticket, Add Comment, Search Tickets), file operation tools (File Read, File Write, File Edit), shell tools (Bash Command), and preset groups (All Tools, All Kombuse Tools).
Clicking Add Permission saves the new rule. Existing rules appear as bordered cards showing the resource or tool name, the configured actions, the scope badge, and edit and delete icon buttons.
Permission Scopes
Section titled “Permission Scopes”Each permission rule has a Scope that defines how broadly the rule applies:
| Scope | Description |
|---|---|
| Invocation | The permission applies only during the current agent session. Once the session ends, the permission expires. |
| Project | The permission applies to all of the agent’s sessions within the same project. |
| Global | The permission applies across every project in the workspace. |
For most use cases, Project scope provides a good balance between security and convenience. Global scope should be used sparingly, as it grants the agent access across the entire workspace.
Interactive Permission Approval
Section titled “Interactive Permission Approval”When an agent attempts to use a tool or access a resource that is not covered by its pre-configured rules, a Permission Request bar appears at the bottom of the chat interface during execution.

The Permission Request bar displays:
- A Shield icon and the uppercase label Permission Request
- A monospace badge with the tool name (e.g.
Bash,mcp__kombuse__add_comment) - A description of what the agent wants to do
- For Bash commands: the full command text in a code block
- For file operations: the file path
Four response buttons are available:
| Button | Behavior |
|---|---|
| Allow | Permits this single request and lets the agent continue |
| Always Allow | Permits the request and persists the approval — future identical requests are automatically approved without prompting |
| Reject | Denies the request; the agent receives a denial and may try an alternative approach |
| Suggest | Opens a text input where an alternative can be provided; submitting sends a denial with the suggestion as feedback to the agent |
The Always Allow action stores approvals persistently: for Bash commands, the command prefix is saved (e.g. git) so similar commands are auto-approved in the future; for other tools, the tool name is added to the agent’s auto-approved tools list.
The Permissions Page
Section titled “The Permissions Page”The Permissions page provides a centralized view of all permission activity across agents in a project. It is accessible from the project sidebar (Shield icon, labeled “Permissions”) or via the Command Palette (Cmd+K → “Go to Permissions”).
The page organizes content into three tabs:
Decision Log
Section titled “Decision Log”The default tab shows a chronological history of permission requests. Two filter dropdowns narrow the list by tool name and by behavior (Allowed, Denied, Auto-approved, Pending). A Refresh button reloads the list, and a Load More button at the bottom paginates results in groups of 50.
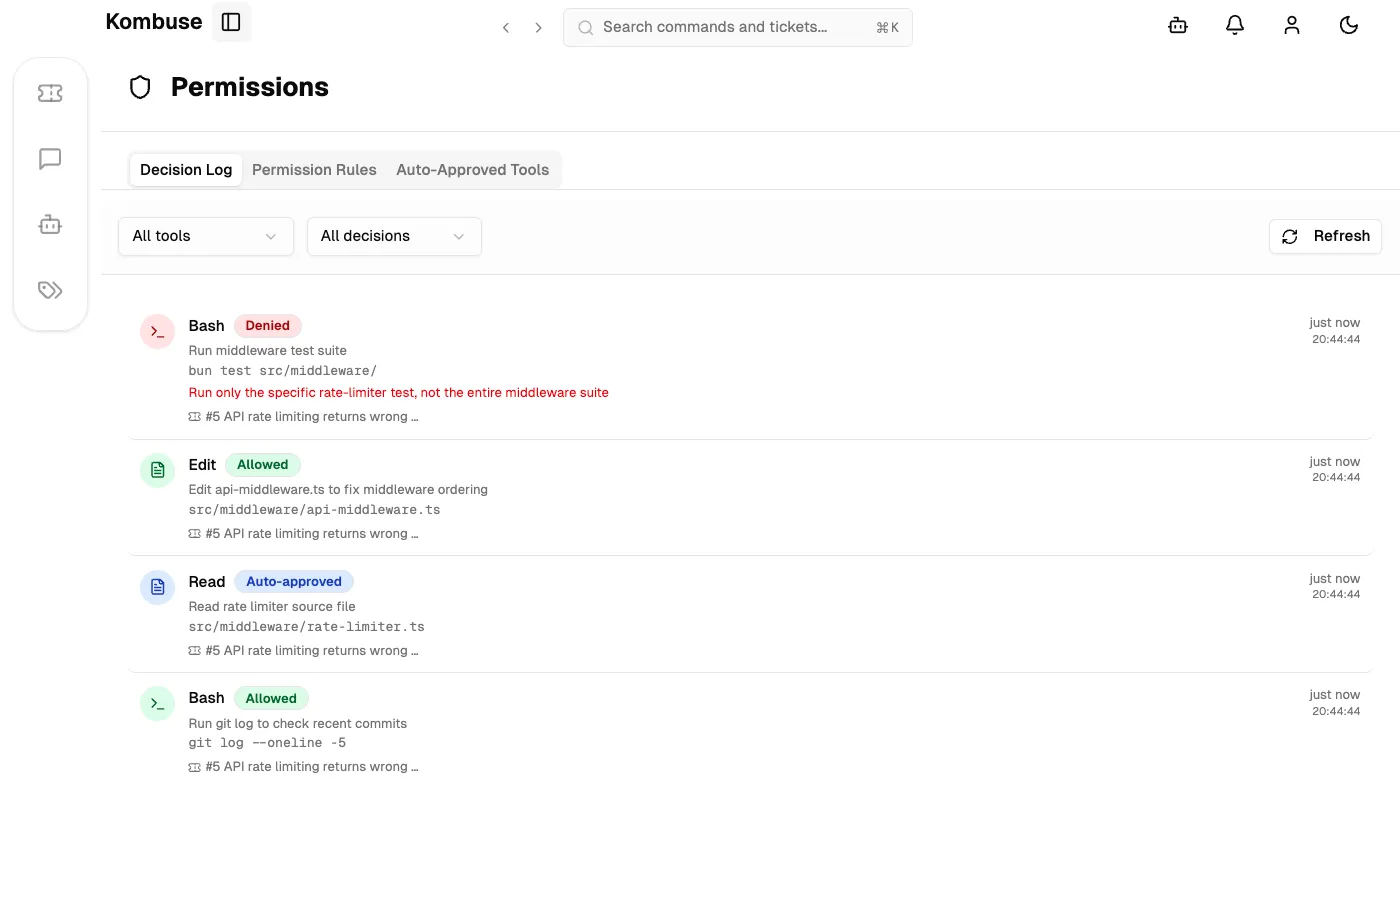
Each entry displays a tool-specific icon, a colored behavior badge, the tool name, a description of the action, links to the related ticket or session, and a relative timestamp.
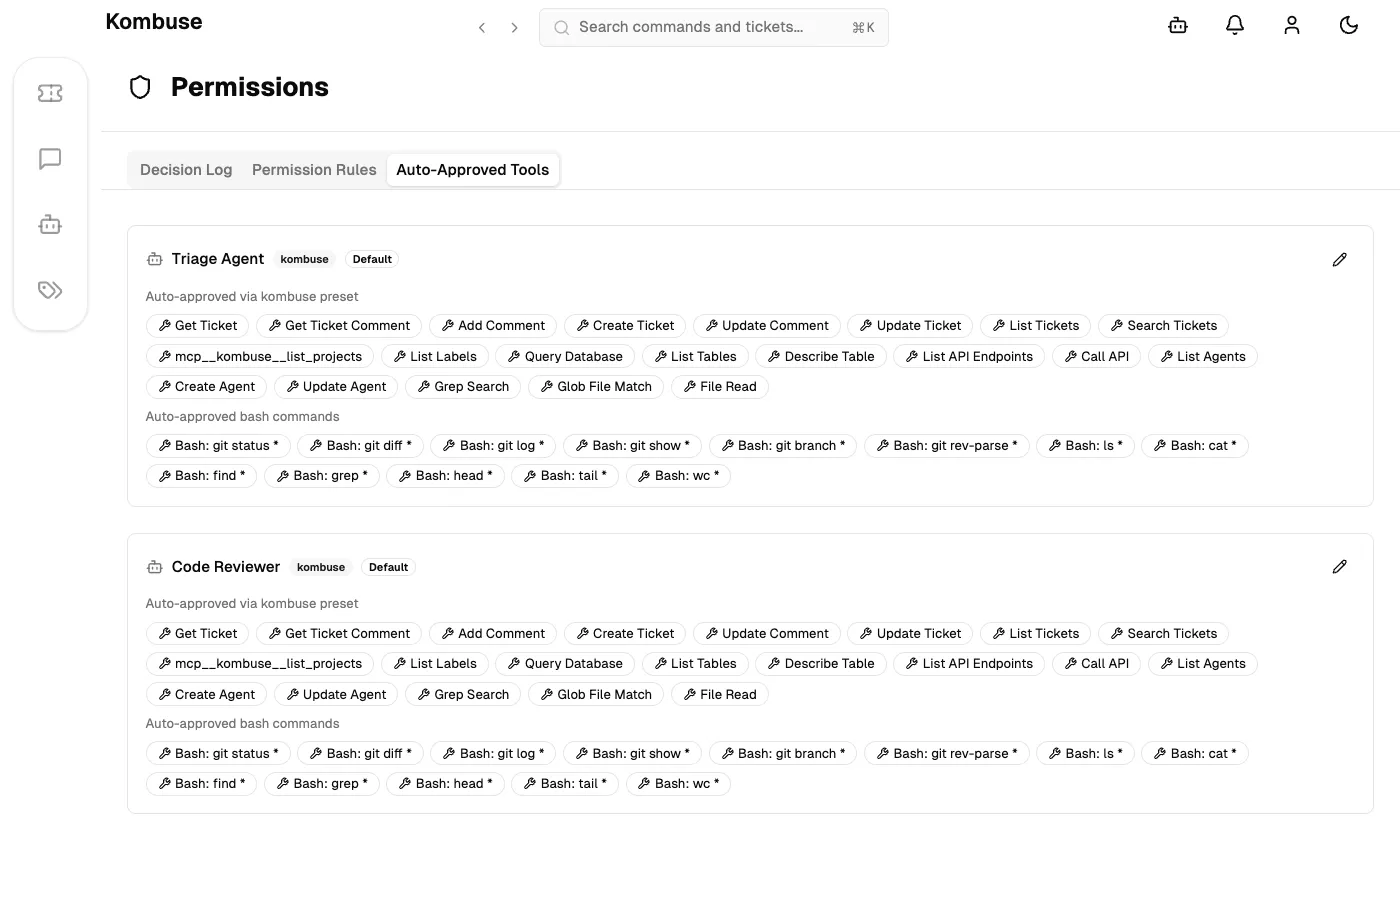
Auto-Approved Tools
Section titled “Auto-Approved Tools”The Auto-Approved Tools tab lists agents alongside their effective auto-approved tools and Bash command prefix overrides. Each agent entry can be opened for editing to add or remove auto-approved tool patterns and Bash command prefixes, or to reset the configuration to the agent’s preset defaults.
Permission Rules
Section titled “Permission Rules”The Permission Rules tab provides a read-only overview of all agents and their explicitly configured permission rules. Each agent’s name, preset type (if any), rule count, and full permission list are shown for quick reference.
See also
Section titled “See also”- Agents — create and configure AI-powered agents
- Building a Plugin — create reusable plugin packages with agents and permissions